The name of the game in dentistry today is to save the tooth for use in the future. In this age of adhesive dentistry, respecting and preserving the remaining healthy tooth structure as well as improving esthetics have become components of value as well. With today’s advanced technology and materials, longevity is mainly a matter of diagnosis, correct treatment planning and proper execution of technique.The problem with replacing old amalgams with tooth-colored composites is that they are difficult, inconsistent and unpredictable. Yet, the warranty on these 30-, 40- and 50-year-old silver fillings is running out. We have to remember that amalgam technology is more than 150 years old. At that time, people lost their teeth a lot earlier and died a lot earlier, too. Now, however, we have a population that is over 50 years old and growing – and they want to keep their teeth feeling good and looking good. Patients are now living longer and they want and expect to keep their teeth for a lifetime.
Adhesive dentistry offers a more conservative restorative approach to conventional dentistry. Why take away healthy tooth structure when there’s a viable alternative? Why not attempt to save the good and just replace the bad? Direct composites and laboratory composite resin systems are valuable and worthwhile options to preserve tooth structure and long-term dental health. After all, preserving a patient’s natural tooth, whenever possible, is always in his or her best interest.
It has been our experience that providing multiple, large interproximal posterior composites directly can be difficult to achieve on a consistent basis in the oral environment, especially when replacing amalgams. Why? Because they take a lot of chair time. Amalgams require bulk. That’s why we were taught the block type preparation to provide the necessary bulk for strength.Furthermore, because amalgams do not bond, we were taught to create undercuts and “extension for prevention.” As mercury contracts and expands with cold and hot temperature changes over time, cracks form in the glasslike nature of teeth.
Most of the time, these large preps are difficult to restore with direct composite. There are isolation and contamination issues, and it is difficult to replicate nature in the mouth in a timely, cost-effective and predictable manner for every case, every time. In addition, curing in layers makes for a long appointment and increases the possibility of contamination. It is uncomfortable for patients to keep their mouths open for the prolonged amount of time necessary.
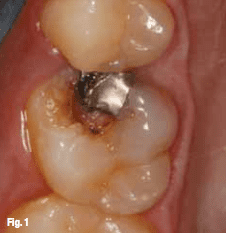
Fig. 1 #3 pre-op, palatal view. (Photos/Provided by Dr. Lorin Berland and Dr. Sarah Kong)
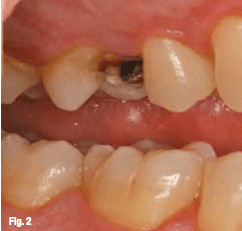
Fig. 2 #3 pre-op, buccal view
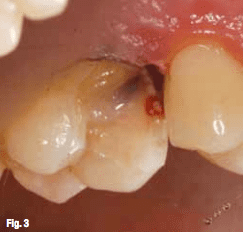
Fig. 3 Decay removed and lining placed
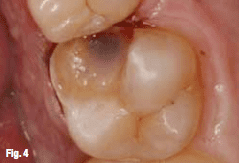
Fig. 4 Prepped tooth, palatal view.
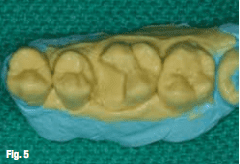
Fig. 5 Silicone model.
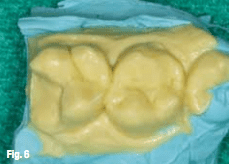
Fig. 6 Sectioned model.
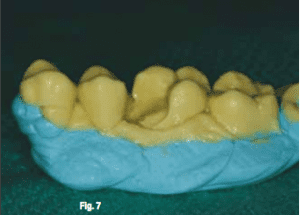
Fig. 7 Silicone model, buccal view.
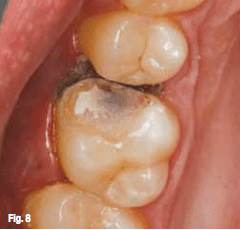
Fig. 8 Tooth ready to bond.
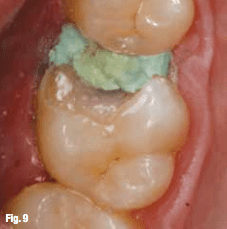
Fig. 9 Expasyl placed interproximally prior to seat.
In addition, caries detectors were non-existent when the bulk of amalgam restorations were placed so many teeth have recurrent decay under the old amalgam fillings.After thorough clinical and radiographic examinations were performed, it was determined with the patient’s input that a same-day onlay would be the most prudent option for this tooth. This way, he would be receiving the maximum amount of care in the least amount of time.
The procedure
After placing topical anesthetic, articaine HCl 4 percent with 1:1,00,000 epinephrine was administered to achieve profound anesthesia. Next, a nitrous oxide nasal mask was placed to decrease the patient’s exposure to mercury aerosol while the amalgam was being removed. In this case, because the patient opted not to use nitrous oxide, pure oxygen was administered through the nasal mask.
We continued by isolating tooth #3 with a rubber dam. This step was essential to reduce the amount of amalgam ingested by the patient. It also offers isolation, higher visibility and better dentistry for our patients. If doing quadrant dentistry, I like to use the split-dam technique, which stretches to include several adjacent teeth in a quadrant. A FenderWedge
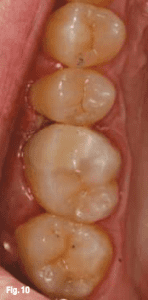
Fig. 10 Onlay seated, palatal view
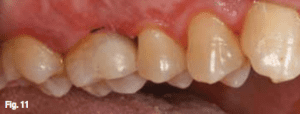
Fig. 11 Onlay seated, buccal view
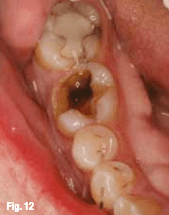
Fig. 12 #30 pre-op.
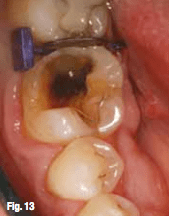
Fig. 13 FenderWedge in place.
To facilitate removal of the remaining amalgam restoration, an hourglass-shaped diamond bur was used as diamonds are less likely to produce the fracture and craze lines associated with carbide burs. High-speed evacuation was used throughout the procedure to help decrease possible inhalation and ingestion during amalgam removal.
Caries detector was painted onto the prepared surface, and it was noted that cracks associated with the long-time expansion and contraction of the mercury-filled amalgam restoration had contributed to the apparent interproximal decay. Once the decay was carefully and completely excavated using a
small, round diamond bur and a spoon excavator, the tooth was insulated in a few important steps (Fig. 3).
After air thinning and light curing, a flowable composite (Premise Flowable, Kerr Dental) in the lightest shade was added to the internal walls and floor to create an even floor and to fill in undercuts that were originally prepared for amalgam retention. A flat-end cylinder, fine-grit, short shank diamond was used to refine the tooth preparation after insulation was completed (Fig. 4). Next, two Identic hydrocolloid alginate impressions (Dux Dental) were taken fast and accurately. They take only 90 seconds to set with our chosen materials, so they are ideal for same-day inlay/onlays. Before expressing the hydrocolloid material into the prepped tooth, we squirted a little surfactant (PrepWet Plus, Dux Dental) onto the tooth to wet the prep while my assistant mixed the alginate.
Meanwhile, a second assistant was loading a syringe with warm Identic Syringable Hydrocolloid Cartiloids (Dux Dental) to hand to me. The “plug” was
‘Adhesive dentistry offers a more conservative restorative approach to conventional dentistry. Why take away healthy tooth structure when there’s a viable alternative? Why not attempt to save the good and just replace the bad?’
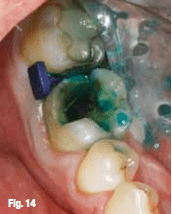
Fig. 14 Caries detector.
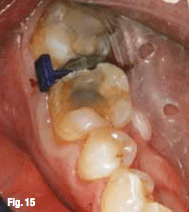
Fig. 15 Prep with liner.
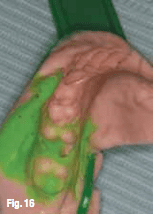
Fig. 16 Identic Hydrocolloid impression
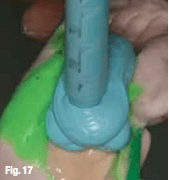
Fig. 17 Basing the poured impression.
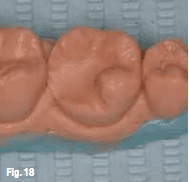
Fig. 18 Silicone model.
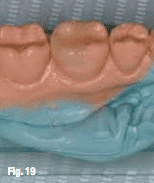
Fig. 19 Model with undercuts waxed
The patient then had about an hour break while the inlay was being made and was able to make the most efficient use of his time by having his teeth cleaned with the hygienist during this break in treatment. This not only made the time seem to go by faster for the patient, but it also eliminated “dead time” in
our schedule.The patient made the most of his time in the chair, fixing his broken tooth and getting his teeth cleaned. This type of combination treatment lends itself to a more productive day when scheduled this way, and patients really appreciate it.
The onlay was incrementally built in composite layers with a D2 primary dentin base shade (Premise Indirect Primary Dentin, Kerr Dental)
Once the onlay was cured with light, heat and pressure in the BelleGlass curing unit (Kerr Dental) for 10 minutes, it was fitted, adjusted and polished on the silicone models (Figs. 6, 7) with various burs
and polishing wheels. All margins, contacts and contours were easily and accurately verified outside the mouth, saving valuable chair time and clinical frustration.Seating the onlayWhen seating the onlay, a medium size Isolite (Isolite Systems) was applied for easy isolation, suction,
bite rest and illumination during the cementation of the onlay. No further anesthesia needed to be administered as the tooth had been lined with flowable composite during the prep stage. Patients really appreciate this — especially because they are almost back to “normal” by the time they leave.
The onlay was then tried in to verify proper contacts, contours, margins and esthetics. Before cementation, Expasyl (Kerr Dental) was gently packed into the sulcus (Fig. 8). The aluminum chloride dried the tissue, reducing the risk of sulcal seepage and contamination. The FenderWedges were then inserted beneath the interproximal floor to slightly
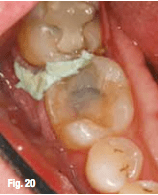
Fig. 20 Expasyl prior to seat.
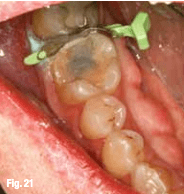
Fig. 21 Expasyl and FenderMate prior to seating.
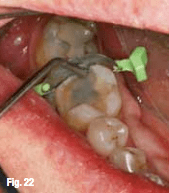
Fig. 22 Adapting FenderMate.
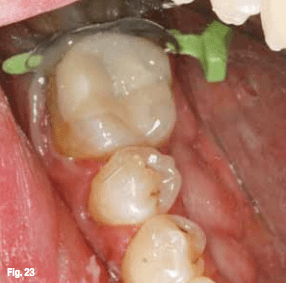
Fig. 23 Seating onlay
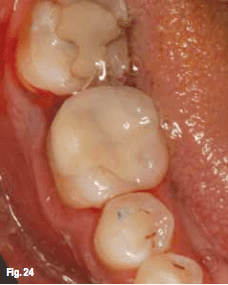
Fig. 24 Final onlay.
After rinsing the Expasyl (Kerr Dental) thoroughly, the enamel and composite core were gently microetched
with aluminum oxide (EtchMaster, Groman Dental) to increase retention and remove any debris. Then the enamel and composite core were etched for 15–30 seconds. A single component, fifth-generation adhesive (OptiBond Solo Plus Unidose, Kerr Dental) was applied in two coats and air-thinned until there was no more movement. The enamel should be glossy (Fig. 9). Flowable composite (Premise Flowable, Kerr Dental) was dispensed into the prepped tooth and then the inlay was inserted into the tooth. The FenderWedges were removed and the onlay was further seated using the Titaniu- coated #21 Acorn with gentle pressure. Complete seating was facilitated using the contra-angle packer/condenser while an explorer was helpful in removing excess flowable before curing. When dealing with onlays involving interproximal surfaces, it is a good idea to floss after seating the onlay and before curing. The restoration was cured from all angles, starting at the interproximal gingival floors where leakage is most likely to occur.
Once the proper occlusion was established, a diamond-impregnated point and/or cup was used to polish the restoration. Polishing was further enhanced through the addition of polishing paste.
In just one appointment, an esthetic and conservative interproximal onlay replacing a mesiobuccal cusp was prepped, placed and polished (Figs. 10, 11)._Case No. 2This patient also came in with a dental emergency. The filling had fallen out of his broken, lower right
molar the day before he was going overseas for three weeks on business. He wanted a “quick and permanent
solution” (Fig. 12).
First the tooth was anesthetized. Next, a FenderWedge was used to isolate the involved tooth, protect the adjacent interproximal surface and pre-wedge the teeth for optimal contacts (Fig. 13). The Isolite was placed to obtain a dry and illuminated field. We used caries detector to ensure complete decay removal (Fig. 14). The tooth was then microetched, etched and desensitized with HemaSeal and Cide (Advantage Dental Products). Two layers of selfetching bonding agent (OptiBond All-In-One Unidose, Kerr Dental) were applied to provide reduced postoperative sensitivity and high dentin bond strength. This was then air-thinned and light-cured. Flowable composite (Premise Flowable, Kerr Dental) was added to the internal walls and floor, creating an even floor and filling in undercuts that were originally prepared for caries removal and amalgam retention (Fig. 15). After the tooth was insulated, the prep was refined with a flat-end cylinder, fine-grit, short shank diamond.
and light curing.
When seating the onlay, the Isolite was reapplied for isolation, ease of placement and the patient’s comfort during the cementation stage. Before cementation, Expasyl (Kerr Dental) was gently packed
into the sulcus, creating a dry space between the tooth and tissue without any risk of rupturing the
The FenderMate was then inserted beneath the interproximal floor to slightly separate and isolate the adjacent teeth and to help facilitate seating the onlay (Fig. 23). The Expasyl (Kerr Dental) was rinsed off thoroughly and the FenderMate was adapted to the adjacent interproximal surface with a condenser (Fig. 24).
A single-component, fifth-generation adhesive (OptiBond Solo Plus Unidose, Kerr Dental) was applied in two coats and air-thinned until there was no more movement. No curing was done at this time.
Once the ideal occlusion was established, diamond-impregnated points and/or cups were used to polish the restoration, starting with the coarsest grit first and finishing with the finest grit for a smooth finish while a PDQ composite polishing brush (Axis Dental) with composite polishing paste (Enamelize, Cosmedent) made for a final high shine._ConclusionThere are certainly clear advantages for both the patient and the dentist when doing indirect composite resin restorations. These restorations have helped us save patients’ teeth, time and money. Over the last 20 years, we have tweaked, updated and modified these restorations in terms of techniques, materials and equipment. These restorations not only save time and conserve healthy tooth structure, they are a valuable service to provide to our patients; and they appreciate it. Direct composites are an essential part of our armamentarium. Nevertheless, indirect composite restorations have many advantages, especially when dealing with multiple restorations involving adjacent interproximal surfaces. There is simply no comparison between the strength of these materials made outside of the mouth with those cured in the mouth.
‘The problem with replacing old amalgams with tooth-colored composites is that they are difficult, inconsistent and unpredictable. Yet, the warranty on these 30-, 40- and 50-year-old silver fillings is running out. We have to remember that amalgam technology is more than 150 years old.’
